As we all know, the first step towards stopping an issue from reoccurring is to find the root cause of the problem and then fix this. All too often we tend to fix the surface issues without taking the time to find the root cause. This is largely due to the fact that the root cause of the issue can often be masked by the surface issues: you may have a lot of customers complaining about late deliveries and assume it’s because despatch aren’t sending goods out in a timely manner, whereas the route cause may actually be the fact that manufacturing keep having breakdowns on a particular machine and aren’t getting goods to despatch at the appropriate time. Using these tools to analyse the root cause will enable you to find the root cause issue in manufacturing rather than just fixing the apparent despatch issue.
There are six basic steps required in any root cause analysis to ensure that the issue is clearly identified and rectified. These are:
- Recognise the problem – recognise when something isn’t what it should be. Without recognition that there is an issue, it will never get resolved.
- Define the problem – it is important to define the problem so that everyone has a clear understanding of what the problem is and what the situation is that needs to be resolved.
- Analyse the problem – carry out analysis of the problems, find out the areas in which the issue occurs, how often the issue is occurring, and what the consequences are of this issue occurring.
- Find the root cause – having completed the above, it is then important to analyse and categorise the information you have gathered to enable you to identify what the most likely root cause of the issues is.
- Eliminate the root cause – having identified the root cause it is then important to eliminate this cause. However, in some cases this may not be possible to eliminate entirely, but you should at least be able to improve the root cause issue in some way.
- Monitor the symptoms – this step is very important as it is essential to know if you have indeed eliminated the root cause issue. This will also help you to identify if the root cause has now moved to a different area, having fixed the first root cause issue.
We’ve pulled together some of the best methods to help you with identifying the root cause of manufacturing issues. These are all well-established tools that have been used for many years in root cause analysis.
The Five Why’s
The 5 Why’s is one of the most effective methods of getting to the root cause of a problem. Asking the question ‘Why?’ five times enables you to go deeper in your analysis of the problem and gain a clearer picture of where the underlying issues is. An example of the 5 Why’s questioning method may go something like this
- Customer phoned and complained that his parcel was late – Why?
- The goods were despatched after the promised ship date – Why?
- Despatch received the goods a day later than they should have done – Why?
- Quality control didn’t release the goods when they should have done – Why?
- There had been a machine breakdown and repair and all of the goods in first few batches following this repair had to be inspected which made extra work for quality control and therefore the goods were late getting to despatch.
Having been able to identify the root cause, you are then in a position to start fixing the root cause and putting measure in place to ensure that if such an issue does occur again, there’s processes that can be followed to minimise disruption. In this instance, it may be a case of putting a system in place to ensure there are more staff in quality control following a machine breakdown to ensure that there is enough resource to inspect the additional quantity of goods, and therefore goods don’t become late to despatch.
Fishbone Diagram
A fishbone diagram is typically used where there is no known root cause, and a very broad and in-depth brainstorm session has to take place to try and identify the root cause and enable a resolution to be reached.
The fishbone looks at the problem, and then helps you to break it down into subcategories that link back to the main issues, enabling you to investigate these subcategories in more details.
The fishbone diagram example below shows how it may be used to identify the roof case of an incorrect or delayed delivery.
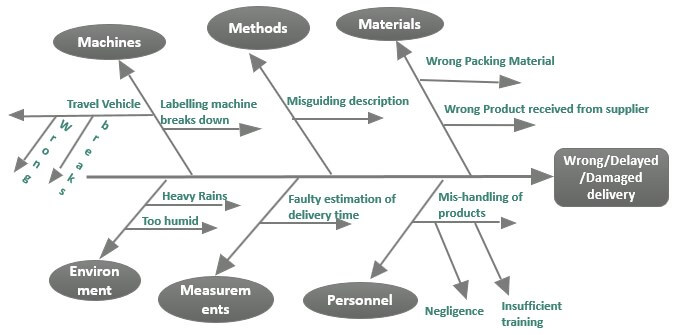
There are many free downloadable templates that can be used for this analysis, however the headings show above are the ones most commonly used when trying to identify a manufacturing root cause issue as they are the key components of any manufacturing process.
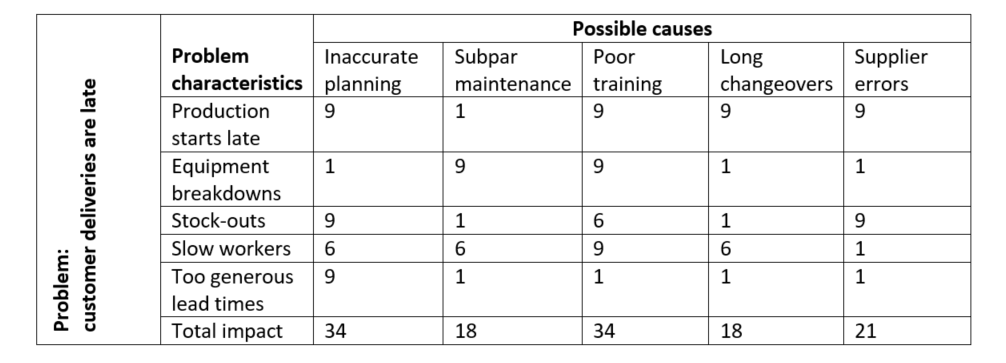
Matrix Diagram
A matrix diagram is useful when you find there are a number of causes that have contributed to the problem, and you are trying to identify which of them is having the greatest impact.
A matrix diagram looks like the below, and you will need to brainstorm the characteristics and possible cause of the problem to enable you to complete the matrix. Once you have identified these, the characteristics of the problem can be plotted down the left-hand side of the matrix, and the possible cause of the issues should be plotted along the top. The next step is then to start filling in the matric with a number defining how big an impact each of the causes has on the characteristics; ie. how big an impact does inaccurate planning have on production starting late? Low impact is usually defined as a 1, and high impact would be 9. Any number between 1 and 9 can be used.
Having completed this table, scores for each possible cause should be added together and totalled at the bottom of the matrix. The possible cause with the highest score is typically the root cause that needs to be fixed. Once you have fixed the initial root cause issue, you may find it useful to re-run this matrix as you may still be having the same type of issue, but the root cause may have moved on to another area.
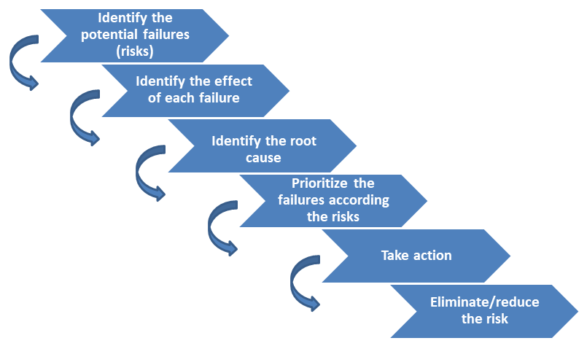
Failure Mode and Effect Analysis (FMEA)
The failure mode and effect analysis tool is typically used to identify potential process, production and product issues before they actually occur. It is usually used prior to the implementation of a new process, product or production process. It identifies areas where the system is likely to fail, and then each potential failure is assessed for the severity of the failure, the occurrence of the failure, and detection of the failure. Having identified these areas of risk and given them a risk score, these scores are then totalled to give a risk priority number (RPN). Risks are then prioritised according to this score and action taken to reduce or eliminate the risk.

These are just four of the most commonly used root cause analysis tools, but as you can see, they will enable you go quickly get to the root cause of any manufacturing issues. Just like when you identify bottlenecks in your production process, it is very important to continue to undertake root cause analysis once you have solved the first issue you identify. This is because you will often find that when you fix one root cause, the issue often then moves to another place in the process. Systematically working through and fixing these issues will enable you to have a far more effective and productive manufacturing process, which will typically result in a vastly improved OEE.
If you would like any more information on these analysis tools, then please do get in contact on 01223 499488 or helpline@granta-automation.co.uk.
Watch automation videos…


