How To Analyse and Improve Workflow Efficiencies

to go about it:

  1. Understand the Current Workflow:
    Document the existing workflow processes in detail. This includes mapping out each step, who is responsible for it, the time it takes, and any potential bottlenecks.
  2. Gather Data and Metrics:
    Collect data on the various aspects of your workflow. This may involve using time tracking software, surveys, or direct observation. Make sure to capture both quantitative and qualitative data.
  3. Analyse the Data:
    Utilise the collected data to identify areas in the workflow that are bottlenecks or need improvement. Look for patterns, inefficiencies, and discrepancies between expected and actual results.
  4. Brainstorm Solutions:
    Involve employees and relevant stakeholders in brainstorming sessions to generate ideas for workflow improvements. Consider technology solutions, process changes, or resource reallocation.
  5. Prioritise Improvement Opportunities:
    Assess the potential impact and feasibility of each improvement opportunity. Prioritise those with the most significant potential benefits and the lowest implementation barriers.
  6. Implement Workflow Changes:
    Develop an action plan for implementing the identified improvements. This may involve changing processes, reallocating resources, adopting new tools or software, or providing additional training.
  7. Provide Training and Support:
    Ensure that employees are properly trained and supported during the transition to the improved workflow. Effective change management is crucial.
  8. Test and Pilot Changes:
    Before rolling out changes organisation-wide, pilot them in a controlled setting to identify any unforeseen issues or challenges.
  9. Set Clear Objectives:
    Define specific and measurable goals for the workflow improvements. These objectives should be aligned with the overall business or organisational objectives.
  10. Identify Key Performance Indicators (KPIs):
    Determine the KPIs that matter most for your workflow. These could be cycle time, error rate, throughput, cost per unit, or any other relevant metrics.
  11. Measure the Impact:
    Continuously monitor the KPIs and other metrics to measure the impact of the changes. Ensure that the improvements are delivering the expected results.
  12. Iterate and Refine:
    Be open to making further adjustments if the initial changes do not achieve the desired improvements. Iterate on the process until you achieve the desired level of efficiency.
  13. Document the New Workflow:
    Update your workflow documentation to reflect the new and improved processes. This will help in training new employees and maintaining consistency.
  14. Maintain a Continuous Improvement Culture:
    Encourage a culture of continuous improvement where employees are encouraged to identify and suggest improvements regularly.
  15. Regularly Review and Audit:
    Periodically review the workflow to ensure that it remains efficient and effective. Workflow analysis and improvement should be an ongoing process.


Remember that the key to successful workflow analysis and improvement is to involve employees and stakeholders, measure the impact of changes, and be adaptable in response to evolving needs and objectives.

If you are looking to see how automated palletising might affect your workflow efficiencies, feel free to contact us on 01223 499488 or helpline@granta-automation.co.uk and we will be happy to discuss this. Typically installing an automated palletising system will result in a significant production increase, along with a reduction in Health & Safety Claims.  Payback is also often less than one year.

Posted in Auto Palletiser, Automated Palletising, Company news, Granta Updates, Palletising, Robotic Palletising | Tagged , | Comments Off on How To Analyse and Improve Workflow Efficiencies

What Products Can Be Automatically Depalletised?

Automatic depalletisation can be used for a wide range of products across various industries to streamline warehouse and manufacturing operations. The suitability of a product for automatic depalletisation depends on factors such as its size, shape, weight, fragility, and packaging. Here are some common types of products that can be automatically depalletised:

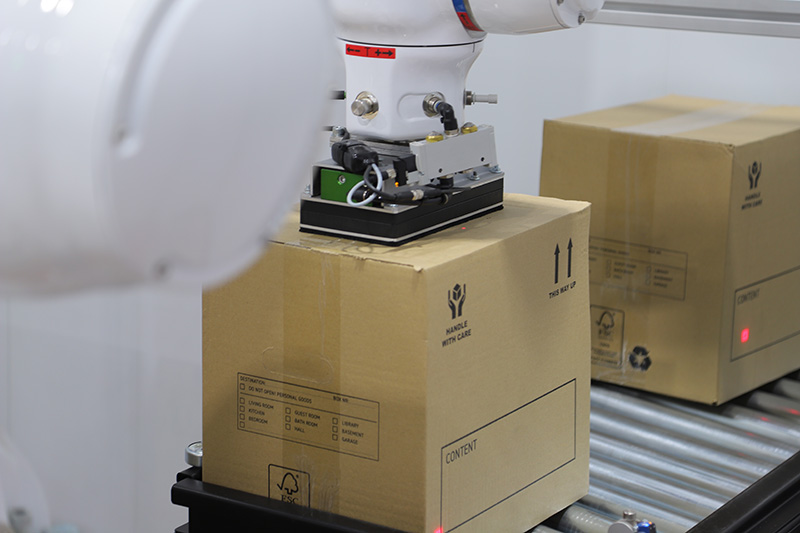
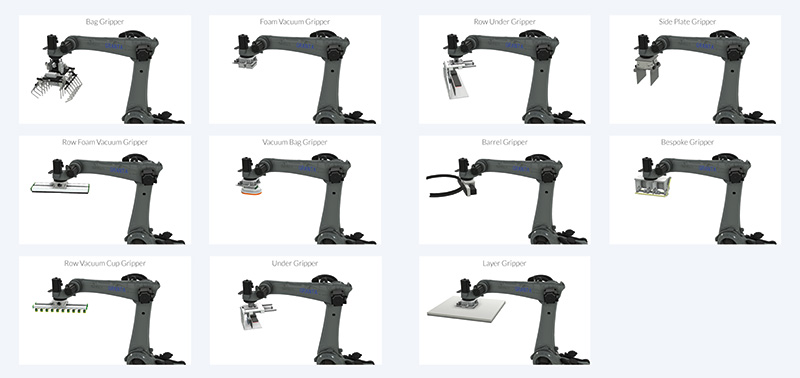
  1. Cartons and Boxes: Automated systems can handle depalletising of cartons and boxes of different sizes and weights. This is commonly used in retail, distribution centres, and e-commerce warehouses.  A vacuum gripper us typically used for depalletising cartons and boxes.
  2. Bags and Sacks: Products packaged in bags or sacks, such as grains, flour, or pet food, can be automatically depalletised.  A vacuum bag gripper is typically used for this, but it does depend on the bag types and product inside the bag. A hook type system which actually puncture the bag can be used for some situation, eg. Hessian or polypropylene sacks, where a vacuum gripper will not work and the bag integrity does not matter. Not all sacks and bags can be depalletised satisfactorily, it is very application specific.
  3. Bottles and Containers: Automated systems can be used to depalletise bottles, jars, cans, and containers in the food and beverage industry, as well as pharmaceuticals. A bespoke gripper will typically be used for this, and it will be designed to specifically suit the type of bottle/container being depalletised.
  4. Palletised Drums: Industries like chemicals and oil may use automatic depalletisation for handling palletised drums. A barrel gripper is usually used for this, which has two arms that clamp around the barrel or drum.

It’s important to note that the specific equipment and technology used for automatic depalletisation can vary widely depending on the type of product and the desired level of automation. Automated depalletisation systems may use robotic arms, conveyors, vacuum grippers, suction cups, or a combination of these technologies to handle products effectively and safely.

The choice of depalletisation solution should be carefully considered based on the product characteristics, production volume, and operational requirements of the facility.

To find out more about depalletising, contact us on 01223 499488 or helpline@granta-automation.co.uk.  We will also be very happy to discuss your specific application.

Posted in Automated Palletising, Bag Palletiser, Box Palletiser, GA15 Palletiser, Palletiser - Granta GA15 Palletiser System, Palletising, Robotic Palletising | Tagged , | Comments Off on What Products Can Be Automatically Depalletised?

What Does Easy Programming Palletiser Mean?

An “easy programming palletiser” typically refers to a palletising system or machine that is designed to be user-friendly and straightforward to program. Palletising involves arranging products or items onto a pallet in a specific pattern or configuration. This is commonly used in manufacturing and logistics to efficiently stack goods for transportation or storage. 

Palletisers are traditionally set up by teaching a robot pick and place points for each box in each layer and duplicating this up the pallet stack. This is very slow and requires skilled programmers time to program the system. It also means that for every product change, a skilled programmer is required to reprogram the system for that product.

When the term “easy programming palletiser” is used, it often implies that the machine or system has software or controls that are intuitive and accessible for operators or programmers. The goal is to make it simple for individuals to define the palletising pattern, set parameters, and customize the operation of the palletiser without requiring advanced programming skills. This ease of programming can save time and reduce the need for specialized technical knowledge, making the palletiser more versatile and user-friendly for a broader range of applications and industries. While the exact appearance and interface may vary from one manufacturer to another, there are common elements and features you might find in such software:

  1. Graphical User Interface (GUI): The software typically features a visual interface with buttons, icons, and menus. Users can interact with the machine by clicking and dragging items on the screen.
  2. Pallet Layout Design: Users can often design the layout of the pallet by dragging and dropping products or defining patterns on a virtual pallet displayed on the screen. This design may resemble a grid or an empty pallet template.
  3. Product Entry: Easy programming software should make it simple to input product dimensions, weights, and other relevant information. This data is crucial for determining how products should be stacked on the pallet.
  4. Pattern Configuration: Users can specify how products should be arranged on the pallet, including layer patterns, interlocking, and any stacking constraints. This can often be done through visual controls or preset patterns.
  5. Stacking Rules: The software may allow users to define rules or logic for how products are stacked. For example, it might consider product fragility or stacking stability.
  6. Preset Templates: Some software provides pre-defined palletising templates or templates for specific industries, making it easy to get started quickly.
  7. Simulation and Preview: Users can often preview or simulate the finished stacked pallet to see how the programmed settings will be applied in practice. This helps identify and correct potential issues.
  8. Error Handling: The software should provide clear and user-friendly error messages if there are any issues with the programming or setup.
  9. Control and Monitoring: Users may have access to controls for starting, stopping, and monitoring the palletising process. Real-time feedback on the machine’s status can be provided.
  10. Offline Programming: Some software allows for offline programming, which means that you can create, edit, and optimize palletising programs on a computer remotely for support when required.
  11. Help and Documentation: Users should have access to help resources, documentation, and customer support to assist them in using the software effectively.

The exact look and layout of the software will depend on the manufacturer and the specific model of the palletiser. The primary goal of such software is to streamline the setup and operation of the palletiser, making it more accessible to a wider range of users without advanced programming skills.

Below is a video showing an example of the Granta easy programming software


If you would like to know more about the Granta GA15 easy programming software, then please do get in touch on 01223 499488 or contact us at helpline@granta-automation.co.uk.  We will also be very happy to arrange a free trial of your product on a palletiser if you require this.

Posted in Auto Palletiser, Automated Container Unloading, Automated Palletising, Bag Palletiser, Box Palletiser, Container Destuffing, Container Destuffing Palletising, Container Unloading Palletising, GA15 Palletiser, Palletiser - Granta GA15 Palletiser System, Palletising, Robotic Palletising | Tagged , | Comments Off on What Does Easy Programming Palletiser Mean?

What Is The Best Method For Scoring and Evaluating Capex Investment Opportunities?

Scoring and evaluating capital expenditure (CapEx) investment opportunities can be a systematic process that helps prioritise and enables you to make informed decisions. Whilst the “best” method may vary depending on your organisation’s needs and goals, the following steps can guide you in creating an effective scoring and evaluation system:

  1. Define Evaluation Criteria:
    Start by defining clear and specific criteria that align with your organisation’s goals and strategic objectives. These criteria can be financial and non-financial. Examples include ROI (return on investment), NPV (net present value), IRR (internal rate of return), strategic alignment, risk, market potential, and environmental impact.
  2. Weight the Criteria:
    Assign weights to each criterion based on its importance. The weights should reflect the relative significance of each criterion in the decision-making process. Financial criteria like ROI may carry more weight than non-financial criteria like environmental impact, for example.
  3. Develop a Scoring System:
    Create a scoring system, typically on a scale (e.g., 1-10), for each criterion. This system allows you to quantify how well each investment opportunity performs against the criteria.
  4. Data Collection and Analysis:
    Collect data and conduct a thorough analysis of each investment opportunity against the established criteria. This may involve financial modelling, market research, risk assessment, and other relevant analyses.
  5. Score Each Opportunity:
    Score each investment opportunity against each criterion based on the data and analysis. Multiply the scores by the assigned weights for each criterion.
  6. Calculate the Total Score:
    Calculate the total score for each investment opportunity by summing the weighted scores for all criteria. This total score provides an overall assessment of the investment’s quality.
  7. Rank and Prioritise:
    Rank the investment opportunities based on their total scores. Opportunities with higher scores are considered more attractive and should be prioritised.
  8. Scenario Analysis:
    Conduct scenario analysis to assess how changes in key variables (e.g., revenue, cost, interest rates) impact the investment opportunities. This helps account for uncertainty and risk.
  9. Sensitivity Analysis:
    Perform sensitivity analysis to understand how changes in individual criteria might affect the rankings. This helps identify which criteria have the most significant impact on the decision.
  10. Decision-Making:
    Make informed decisions based on the rankings and prioritisation. Consider budget constraints and the availability of resources when selecting which investments to pursue.
  11. Review and Update:
    Periodically review and update the scoring system and criteria to ensure it remains aligned with the organisation’s evolving goals and market conditions.
  12. Documentation:
    Document the evaluation process and the rationale behind the rankings. This documentation is essential for transparency and future reference.
  13. Stakeholder Involvement:
    Involve relevant stakeholders, such as finance, operations, and strategy teams, in the evaluation process to gain different perspectives and expertise.

Remember that the scoring and evaluation process should be flexible and adaptable to the specific needs of your organisation and the nature of the investment opportunities. Regularly assessing and refining your evaluation system ensures that it continues to serve as an effective tool for decision-making.

We have developed some downloadable tools for evaluating palletiser purchases which you may find useful as the same principles would apply to any CapEx investment.

  • Automation payback calculator – click here to download
  • Intangible benefits calculator – click here to download

If you are looking to invest in a palletising system and would like more information then please contact us on 01223 499488 or helpline@granta-automation.co.uk and we will be very happy to help.

Posted in Auto Palletiser, Automated Palletising, Bag Palletiser, Box Palletiser, Company news, Container Destuffing Palletising, Container Unloading Palletising, GA15 Palletiser, Granta Updates, Palletiser - Granta GA15 Palletiser System, Palletising, Robotic Palletising | Tagged , | Comments Off on What Is The Best Method For Scoring and Evaluating Capex Investment Opportunities?

How Does A Vaccum Gripper Work On A Palletiser?

A vacuum gripper used in a palletising system is designed to pick up and place objects, such as boxes or other containers, onto a pallet. Here’s how a vacuum gripper typically works in the context of a palletising system:

  1. Gripper Design: The vacuum gripper is equipped with one or more suction cups or vacuum channels, depending on the design and requirements. These grippers are often attached to a robotic arm or a mechanical system that can move in multiple directions.
  2. Positioning: The palletising system positions the gripper over the object to be picked up, which is usually a box or container.
  3. Vacuum Generation: The vacuum gripper is connected to a vacuum source, typically a vacuum pump or a venturi vacuum generator. When it’s time to pick up an object, the vacuum source is activated.
  4. Suction Cup/Vacuum Pad Engagement: The suction cups, or vacuum pad, are brought into contact with the object’s surface. As the vacuum source operates, it creates negative pressure inside the suction cups/pad, effectively sealing it to the object’s surface.
  5. Object Lifting: The negative pressure differential between the suction cups, or pad, and the object’s surface creates a strong grip, securely holding the object. The gripper’s mechanical system then lifts the object off its current location.
  6. Transportation: The robotic arm or mechanical system carries the object to the desired location, typically a pallet.
  7. Placement: The vacuum gripper positions the object on the pallet, and the gripper’s control system releases the negative pressure, allowing the object to be placed gently onto the pallet.
  8. Release: Once the object is safely on the pallet, the vacuum gripper releases the object by turning off the vacuum and allowing air to enter the suction cups/pad, which equalizes the pressure and detaches the gripper from the object.
  9. Repeat: The process repeats for each object to be palletised, allowing the system to build up a stack of objects on the pallet in a precise and organised manner.

It’s worth noting that palletising systems using vacuum grippers can be highly automated and efficient, capable of handling a large number of objects quickly and accurately. The gripper design and configuration may vary depending on the specific application, the size and weight of the objects, and the layout of the production line or warehouse. Advanced control systems and sensors may also be used to optimise the palletising process and ensure that objects are stacked correctly.

Below is a video showing a row vacuum gripper palletising boxes.

Posted in Auto Palletiser, Automated Palletising, Box Palletiser, GA15 Palletiser, Palletiser - Granta GA15 Palletiser System, Palletising, Robotic Palletising | Tagged , | Comments Off on How Does A Vaccum Gripper Work On A Palletiser?

What Stops A Palletiser From Starting If Someone Is In The Cell?

A palletiser is a piece of industrial equipment used to automate the stacking of products or materials onto pallets. To ensure the safety of personnel working around a palletiser, various safety mechanisms and systems are typically in place to prevent the machine from starting or operating when someone is in the cell or within its hazardous area. Here are some common safety features that can prevent a palletiser from starting when someone is in the cell:

  1. Safety Interlock Switches: Safety interlock switches are devices that are strategically placed at access points to the palletiser cell, such as doors or gates. When these access points are opened, the safety interlock switch is triggered, and it sends a signal to the control system of the palletiser to prevent it from starting or continuing operation.
  2. Light Curtains: Light curtains are sensors that create an invisible barrier of light beams across the access points to the palletiser cell. If someone breaks the light curtain by entering the cell, the control system will detect this interruption and prevent the palletiser from starting or immediately halt its operation.
  3. Safety Area Laser Scanners: Safety area laser scanners, can be installed within the cell to detect the presence of people or objects. If a person enters the cell, these sensors can trigger an immediate stop or prevent the start of the palletiser.
  4. Safety Controller: Modern palletisers often use safety programmable logic controllers (PLCs) or safety relays that are designed to monitor and control safety-related functions. These safety controllers are used to manage the door interlock switches, light curtains, area scanners, and other safety devices to ensure that the palletiser remains inactive when someone is inside the cell.
  5. Emergency Stop Buttons: Emergency stop buttons are strategically located around the palletiser cell. If someone needs to stop the palletiser quickly for safety reasons, they can press an emergency stop button to halt all machine functions.
  6. Safety Reset Button: If the safety system is triggered it has to be reset manually by someone with a clear view of the cell. The palletiser system reset button will not activate the palletiser without the above safety systems being in place. This means that the system will not start without an operator manually confirming the cell is empty and safe to run, this provides a further layer of safety protection.

All safety devices are dual channel ensuring that if one channel is broken the other channel will still be active. If any point in the safety system is compromised (e.g. a wire to a light curtain is cut) the safety system will stop the palletiser from running.

It’s important to note that the specific safety features and systems employed can vary depending on the type and design of the palletiser, as well as local safety regulations and industry standards. Regular maintenance and testing of these safety mechanisms are critical to ensure their reliability and effectiveness in preventing accidents and injuries. Always follow proper safety protocols and guidelines when working with industrial machinery.

If you would like to know more about palletisers and their safety systems, feel free to contact us on 01223 499488 or helpline@granta-automation.co.uk.

Posted in Auto Palletiser, Automated Palletising, Bag Palletiser, Box Palletiser, Granta Updates, Palletiser - Granta GA15 Palletiser System, Palletising, Robotic Palletising | Tagged , | Comments Off on What Stops A Palletiser From Starting If Someone Is In The Cell?

Can A Palletiser Be Purchased as OpEx rather than CapEx?

The primary purpose of distinguishing between capital expenditures (CapEx) and operating expenditures (OpEx) in accounting is to allocate costs and determine how they impact financial statements and taxes. Typically, the purchase of a palletiser is considered a capital expenditure (CapEx) rather than an operating expenditure (OpEx) because it involves a significant upfront investment in a long-lasting asset that will provide value to the business over an extended period. CapEx is usually capitalized on the balance sheet and depreciated over its useful life.

However, there are scenarios where a palletiser’s purchase could potentially be treated as an OpEx depending on your specific accounting practices and circumstances. Here are a few considerations:

  1. Operating Leases: If you acquire the palletiser through an operating lease, the lease payments are typically treated as operating expenses (OpEx) rather than capitalizing the asset. In this case, the palletiser is not recognized as an asset on the balance sheet, and the lease payments are expensed as incurred.
  • Service Contracts: Some palletiser vendors may offer bundled packages that include not only the equipment itself but also ongoing maintenance and service. In such cases, the entire package cost, including equipment and services, may be treated as an OpEx. This approach would be more common in situations where the service component is substantial, and it’s challenging to separate the equipment cost from the services provided.
  • Accounting Policies: Your company’s accounting policies and practices, as well as applicable accounting standards, may influence how you classify the purchase. Some companies may have more flexibility in classifying certain expenditures as OpEx based on their internal accounting policies.
  • Tax Considerations: Depending on local tax regulations and incentives, there may be instances where it makes sense to classify a palletiser purchase as OpEx for tax purposes. However, this would typically require consultation with tax professionals and may not align with standard accounting principles.

It’s crucial to work closely with your finance and accounting teams, as well as consult with accounting experts or auditors, if necessary, to determine the most appropriate treatment of a palletiser purchase based on your specific situation and accounting guidelines. Keep in mind that how you classify the expenditure can have implications for financial reporting, tax treatment, and financial ratios, so it should be done in accordance with relevant accounting standards and legal requirements.

In summary, while the acquisition of a palletiser is typically considered to be a capital expenditure, by leasing a palletiser, it can then become an operational expenditure which brings with it certain tax advantages. The specific treatment may vary depending on your financial and accounting practices.

If you would like to know more about palletiser leasing, please contact us on 01223 499488 or helpline@granta-automation.co.uk. Or follow this link to read more about palletiser leasing and payback.  https://www.granta-automation.co.uk/about-granta/service-and-support/palletiser-leasing

Posted in Auto Palletiser, Automated Palletising, Bag Palletiser, Box Palletiser, Container Destuffing Palletising, Container Unloading Palletising, GA15 Palletiser, Granta Updates, Palletiser - Granta GA15 Palletiser System, Palletising, Robotic Palletising | Tagged , | Comments Off on Can A Palletiser Be Purchased as OpEx rather than CapEx?

How Often Do Palletisers Break Down?

The frequency of breakdowns for palletisers can vary widely depending on several factors, including the quality of the equipment, maintenance practices, the type of products being handled, and the overall operating conditions. Here are some factors to consider:

1. Quality of Equipment: The reliability of a palletiser can be influenced by the quality of the machine itself. High-quality, well-built palletisers from reputable manufacturers are likely to have fewer breakdowns than lower-quality machines.

2. Maintenance: Regular maintenance and servicing are crucial to preventing breakdowns. Palletisers that receive proper maintenance according to the manufacturer’s recommendations are less likely to experience unexpected failures.

3. Type of Products: The type of products being handled by the palletiser can affect its reliability. Some products may be more challenging to handle or may cause more wear and tear on the equipment, increasing the likelihood of breakdowns.

4. Operating Conditions: The environment in which the palletiser operates can also impact its reliability. Dust, humidity, temperature extremes, and other environmental factors can affect the machine’s performance and longevity. Robots and other equipment specified with extra, features like dust protection, low temperature ratings etc can usually overcome these challenges.

5. Operator Training: Adequate training of the machine operators is essential. Improper operation or setup can lead to breakdowns or damage to the equipment.

6. Age of Equipment: Older palletisers may be more prone to breakdowns due to wear and tear, outdated technology, and the unavailability of replacement parts.

To minimize the frequency of breakdowns, it’s essential to:
• Invest in a high-quality palletiser from a reputable manufacturer.
• Follow the manufacturer’s recommended maintenance schedule and practices.
• Train operators to use the equipment correctly and safely.
• Provide a suitable operating environment for the palletiser.
• Consider upgrading or replacing older equipment if breakdowns become frequent and costly.

By taking these steps, you can reduce the likelihood of breakdowns and ensure that your palletiser operates reliably and efficiently.

Taking out a support contract at the time of purchasing a palletising system is also a good way to minimise break downs, as the support package will typically include regular site visits to check and maintain the system.

Posted in Auto Palletiser, Automated Palletising, Bag Palletiser, Box Palletiser, Container Unloading Palletising, GA15 Palletiser, Palletiser - Granta GA15 Palletiser System, Palletising, Robotic Palletising | Tagged , | Comments Off on How Often Do Palletisers Break Down?

How Easy Is ‘Easy Programming’ Palletiser Software? How Does It Differ To Traditional Palletisers?

“Easy programming” palletiser software refers to software that is designed to simplify the programming and operation of palletising robots or machines. The ease of use can vary depending on the specific software and equipment being used, but the primary goal is to make the setup and configuration of palletising tasks more user-friendly and accessible to a wider range of users, including those without extensive programming or technical skills.

Here are some ways in which “easy programming” palletiser software differs from traditional palletisers:

  1. User-Friendly Interface: Easy programming software typically features intuitive, user-friendly interfaces with drag-and-drop functionality or graphical programming. This allows operators to create palletising patterns and routines without needing in-depth programming knowledge. Some easy programming software will auto generate stack patterns and you can simply select the stack pattern you require.
  1. Reduced Coding Requirements: Traditional palletisers often require complex programming codes, such as robotic arm movement sequences written in specialized programming languages. Easy programming software abstracts much of this complexity, allowing users to define palletising tasks with simple commands or visual cues.
  1. Rapid Setup: Easy programming software is designed to minimise the time it takes to set up and reconfigure palletising tasks. Traditional palletisers may require extensive programming and testing, which can be time-consuming.
  1. Flexibility: Easy programming software is often more adaptable to changes in production needs. Users can easily modify palletising patterns, product configurations, or other parameters without extensive reprogramming.
  1. Integration with Other Systems: Many easy programming palletiser software solutions are designed to integrate seamlessly with other automation systems, such as conveyor systems, barcode scanners, and warehouse management systems, to optimize the palletising process.
  1. Error Handling: These software solutions often include error handling and diagnostic features, making it easier for operators to identify and address issues quickly.
  1. Training Requirements: Easy programming software can reduce the training required for operators and technicians, as it doesn’t necessitate in-depth programming knowledge.

It’s important to note that the ease of use and capabilities of “easy programming” palletiser software can vary from one solution to another. Factors such as the complexity of the palletising tasks, the types of products being handled, and the specific software and hardware used will all influence how easy or effective the software is in practice. Organizations should carefully evaluate different options to choose the one that best aligns with their specific needs and production requirements.

This video shows an example of the Granta GA15 easy programming palletiser software.


If you would like to know more about the Granta GA15 easy programming software, then please do get in touch on 01223 499488 or contact us at helpline@granta-automation.co.uk.  We will also be very happy to arrange a free trial of your product on a palletiser if you require this.

Posted in Auto Palletiser, Automated Container Unloading, Automated Palletising, Bag Palletiser, Box Palletiser, Container Destuffing Palletising, Container Unloading Palletising, GA15 Palletiser, Palletiser - Granta GA15 Palletiser System, Palletising, Robotic Palletising | Tagged , | Comments Off on How Easy Is ‘Easy Programming’ Palletiser Software? How Does It Differ To Traditional Palletisers?

Robotic Palletiser vs Layer Former Palletiser

Robotic palletisers and layer former palletisers are both types of automation equipment used in material handling and palletising processes within various industries, including manufacturing, logistics, and warehousing. Whilst they effectively serve the same purpose, they have distinct features, advantages, and disadvantages.

Robotic Palletiser:

  • Robotic palletisers use robotic arms with various end-of-arm tools (EOAT) to pick up single or multiples of items, cases, or bags and stack them onto a pallet in a specific pattern.
  • They offer high flexibility and adaptability since the robot’s programming can be changed to handle different product types and palletising patterns easily.
  • Robotic palletisers are suitable for handling a wide range of products, sizes, and weights.
  • They are ideal for businesses with diverse product lines or frequently changing packaging requirements.
  • Robotic palletisers can also be integrated into other automation systems for material handling and packaging.

Robotic Palletiser Advantages:

  • Flexibility and adaptability, can simultaneously palletise different product off multiple lines.
  • Efficient handling of various products and patterns.
  • Can be integrated with other systems.
  • Reduced manual labour and increased productivity.

Robotic Palletiser Disadvantages:

  • Initial setup and programming can be time-consuming if it is not an easy programming system.
  • Programming expertise required if it is not an easy programming system.

Layer Former Palletiser:

  • Layer formers are specialised machines designed to create complete product layers on pallets.
  • They are typically used for uniform products that are palletised in consistent layers, such as cases or boxes of the same size and weight.
  • Layer formers automate the process of creating layers by arranging products in a predetermined pattern.
  • They are efficient for high-volume production lines with consistent packaging.

Layer Former Palletiser Advantages:

  • High-speed and efficiency for uniform product palletising
  • Sometimes more compact floor footprint than a robotic palletiser for high speeds

Layer Fromer Palletiser Disadvantages:

  • Limited flexibility; not suitable for handling a variety of products or palletising patterns.
  • Less adaptability to changing production requirements.
  • May require manual adjustments for different product types.
  • More moving parts and higher maintenance costs
  • Often higher than a robotic palletising system

In summary, the choice between a robotic palletiser and a layer former palletiser depends on the specific needs and requirements of your production line:

  • If you have a diverse range of products, frequently changing packaging patterns, or require flexibility in your palletising process, a robotic palletiser is a better choice.
  • If your production involves high-volume, uniform products that are consistently palletised in specific patterns, a layer former palletiser can provide cost-effective automation.

Ultimately, the decision should be based on your production goals, budget, and the nature of your products. In some cases, a combination of both types of palletisers may be the most efficient solution.

If you would like to discuss your specific application in more detail, please contact us on 01223 499488 or helpline@granta-automation.co.uk.

Posted in Auto Palletiser, Automated Palletising, Box Palletiser, GA15 Palletiser, Palletiser - Granta GA15 Palletiser System, Palletising, Robotic Palletising | Tagged , | Comments Off on Robotic Palletiser vs Layer Former Palletiser